|
Log: From daily notes - page 1
2001 - Dec.30 - Sun.
Finished grinding a marble stone with carborundum grit #220. This necessity can be either a tedious chore or become part of the magic within the process, a sort of zen meditation can be aquired or you can hypnotize yourself by the repetitive motion if predisposed in that direction.
'01 - Dec.31 - Mon.
Started grinding 1st. limestone, gave it 2 grinds of #100 carborundum grit - 3/4 hr. each. This will be the 'keystone' around which my 'automatic' lithograph will evolve.
2002 - Jan.1 - Tues.
New Years day or no, I continued to grind the supply of new surfaces that will be needed to begin the image. Finished keystone with 1 grind of #180 grit - 1/2 hr., followed by 1 grind of #220 grit -15 min., Dressed edges for another 10 min. This gives some idea of the time involvement in grinding a stone surface ready for use as a drawing and printing surface. Put 1 gal.of tap water in the distiller to process, it takes approx.1-1/2 to 2 hrs. to process. Keystone out of grinding sink and onto work table, next stone in sink for grinding.
'02 - Jan.2 - Wed.
Limestone #2, 2 grinds #100 - 1 hr.each.
'02 - Jan.4 - Fri.
Set registration pins on keystone. I have adapted this method of registration from my commercial printing days, and have since ceased to have registration problems.
'02 - Jan.6 - Sun.
L#2 -1 grind #180
'02 - Jan.7 - Mon.
L#2 - 1 grind #220, dress edges - finis.
Log - page 2
'02 - Jan.8 - Tues.
Set registration pins on 2 stones.
Mixed 6 oz. gum arabic - Formula: 6 ozs. dist. water to 6 ozs. dry powdered gum arabic.
Mix well with wooden chopstick, set gum bottle in pan of hot water, stir occasionally or until all lumps melt, check PH value 4.5 acceptable, store in frig. ready for use. By mixing a small proportion I find there is little if any waste of this valuable and necessary commodity in lithography.
'02 - Jan.9 - Wed.
Stopped out stone edges for bleed-off on the three ground stones -
Formula: 1/2 oz. of fresh gum arabic in beaker
Add 10 drops nitric acid, stir well with wooden chopstick
Paint gum on all edges of the 2 initial stones - they are now ready to receive drawings.
'02 - Jan.11 - Fri.
Key drawing
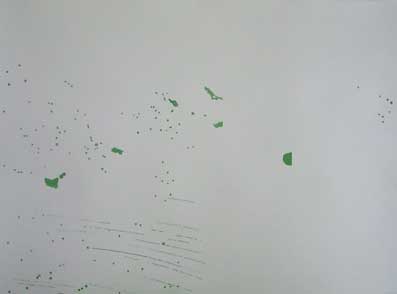
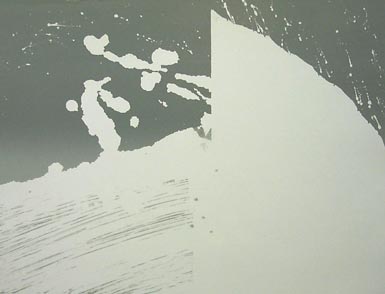
The day of no thought. Readied several tins of tusche washes - graded tints (dark to grey). Used squeeze water bottle to lay down random puddles of distilled water on the limestone surface followed immediately with loaded brushfulls of tusche wash laid directly into these puddles, some dark, others light, according to my kicked-in automatic atoms. This, to my mind, is the only part of the whole process that is 'automatic' - even so I expect a lifetime spent in balancing light and dark tints cannot be overlooked and certainly crept into this composition without any premeditation on my part. Other than a breakfast coffee and a prescribed medication for hypertension - drugs were not involved (In case you wonder, I have never been part of that scene). As the drying time of the tusche/water mixtures involves an hour or so I sit and watch the puddles coalesce - letting them do what they will basically do, sometimes I add a bit more tusche when I note an area lightening beyond what will hold in the rollup process (here experience takes over rather than thought). Eventually, with a murmured acknowledgement to the gods of grease and water I walk away, knowing Jock would do the same had he been into lithography as I have been over the past 25 years. The patient can recover far better on its own.
'02 - Jan.12- Sat.
Key drawing
Layed clean sheet of punched mylar film on the keystone pins. The outlines of the random patterns formed from the dried washes will now be traced to the mylar using a fine water resistant felt pen. Instinctively I start conceiving composition and colour - the mind unconciously involved in this event. The real trick in art is to make it all appear natural, effortless, and spontaneous and possibly automatic - no matter how long it takes. Once the tracing is complete on mylar, I can sort out the areas to trace down (by colour) on stone for surface printing.
'02 - Feb.5- Tues.
Grind limestone for surface printer of under-colours to run prior to the printing of key image. Determined the colours after several hours work on rough draft of image. Gave this stone 2 grinds of #100 grit, and 1 extended grind of #220 grit. Surface printing is not a true lithographic process but rather allows the printer the option of setting up one stone on the press bed to print several initial solid-colours without having to grind away image that would normally be laid down in a high grease content tusche or crayon. The ink base will be laid on the stone in shellac which, after each printing is easily removed with methyl hydrate and/or laquer thinners, the same stone already set up on the press bed is then ready for the next image in shellac and so on, ad infinitum.
'02 - Feb.7 - Thur.
Spent half a day strapping a new maple scraper-bar and setting it into its slot in press yoke - press is now ready for use.
'02 - Feb.8 - Fri.
Calendared 45 sheets of Arches Cover. Ran the entire lot thru press twice with increased pressure on the 2nd. run - used a marble stone as a base. In order to keep static to a minimum I like to dampen the stone with a sponge and clean water before each pass. Calendaring takes most of the stretch out of the paper and makes for better registration when running a multi-coloured lithograph.
Log - page 3
'02 - Feb.9 - Sat.
Punched paper strips, tabbed these to calendared edition and proofing paper - from here on all printed work will be in register to each other.
'02 - Feb.10 - Sun.
Finished tabbing all edition paper, plus enough for proofing sequences.
'02 - Feb.13 - Wed.
Printer #1
Placed stone on press bed and packed. Ready for surface printing procedure.
'02 - Feb.20 - Wed.
Printer #1
Attached pins to stone.
'02 - Mar.8 - Fri.
Printer #1
Etched stone with a mild etch to clean and sensitize for surface printing - procedure: 1oz. gum arabic - 5 drops nitric acid. Mix and pour on stone - hand massage 1 min., buff dry with cheesecloth.
'02 - Mar.16 - Sat.
Printer #1
Washed off surface etch thoroughly with sponges and clean water. Traced down yellow portions of image followed by several lean applications of white shellac to these elements. They will print as solid-colour with little if any texture.
Log - page 4
Note: The shellaced image remained tacky and failed to hold ink when rolling up in colour. Its shelf life no doubt had expired.
'02 - Mar.18 - Mon.
Here I find it neccessary to transgress from the automatic part and get some idea of where the image can go or should go. Traced all the elements to date down on a clean sheet of newsprint, and roughly coloured same with wax crayons. I feel the work from now on will be more instinctive than automatic - sorry Jock.
'02 - Mar.24 - Sun.
Removed the failed surface printer stone from press bed to sink and gave it 1 grind of #220 grit carborundum. Gave the stone a mild etch - 1oz. gum to 6 dr. nitric. Same procedure as Mar.8. After dry, washed the gum/etch off thoroughly with water while still in sink. Stone is now ready to receive the image in new shellac.
Log - page 5
'02 - Mar.25 - Mon.
Clean stone back to press bed and packed. Reg. pins on. Again traced down yellow elements on stone.
'02 - Mar.28 - Thur.
Printer #1 (surface)
Painted yellow elements on stone using fresh shellac. This shellac dried immediately, where the former had remained tacky. Mixed yellow colour, charged 16" neoprene roller, dampened stone and pulled 5 proofs - so so. Rolled image up fully in colour and cleaned stone of any scumming, decided to etch the stone to ensure a sharp printing. Dried the stone, dusted the image with talc, buffed off excess. Etch formula: 2 ozs. gum to10 drops nitric, left on approx. 2 min., then buffed dry. Washed the yellow ink off image through the protective gum/etch with lithotine (quickly, so as not to remove shellac base as well). Stored overnight.
'02 - Mar.29 - Fri.
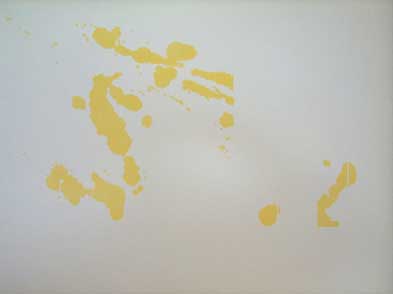
Press Run #1 - (surface) -Yellow - (Proof A)
Mixed white with yellow ink mix to lighten and add needed tack. Rolled out evenly on slab using 81/2" x 16" neoprene roller. Washed gum/etch off stone with water and sponges. Rolled up shellac-base image and pulled proofs untill image running well. Printed all edition paper including the necessary amount for further colour proofing as the image progresses. Time: 1-1/2 hr., ran well. Washed away yellow ink on stone with lithotine through water, cleaned slab and roller after supper.
'02 - Mar.30 - Sat.
Printer #2 (surface)
Wash off yellow shellac image from stone with methyl hydrate - washed away all residue with clean water and sponges. Dried and traced down red elements from mylar master - shellaced red elements.
Log - page 6
'02 - Mar.31 - Easter Sun.
Printer #2 - (surface)
Mix gum arabic: 9fl oz. dist. water - 7oz. dry gum powder.
Mixed red ink (see colour charts).
Followed same procedure as yellow run. Pulled 20 proofs, image starting to scum, need to use an anti-tint solution. Decided to stop run, clean up and resurrect it tomorrow - covered stone, ink on slab and roller with wax paper.
'02 - April 1 - Mon.
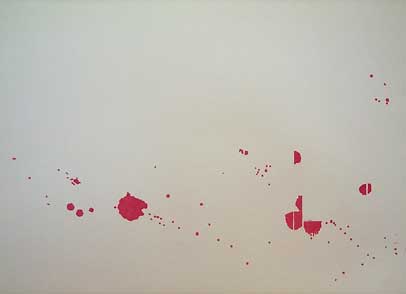
Press Run #2 - (surface) - Red - (Proof B)
This april fool's day prank is on an old fool still trying to print from a stone. Weather -10c and trying to snow. Shovelled accumulation of winter snow from roof valley, and then cleared a path to the woodpile - split and filled woodbin - while you may say this has nothing to do with the project believe me it has everything to do with being able to do it. In shop by 11.am. ready to tackle scumming problem. Procedure: sponge clean water over scummed areas and keep damp while spot cleaning with Q tips and lithotine, as scum dissolves clean away with water sponge. Repeat until entire stone clean. Mixed light gum/nitric etch - 1/2 oz. of gum to 7 drops nitric - brushed into areas affected by scumming further desensitizing stone. Washed entire stone with clean water and sponge. Dried stone, dusted image with talc, rubbed off excess and etched entire stone - Formula: 1-1/2 oz. of gum to 7 drops nitric, rubbed in well with hand, buffed tight and left stone to rest over noon.
Log - page 7
Press Run #2 continued - (surface) - Red - (Proof B)
After lunch shortened the tack of the vermillion ink mix with aerocil. Ran the remainder of the edition with Olga sponging and applying the paper while I concentrated on charging and ink passes to keep the image running clean and crisp. Olga applied an anti-tint solution as neccessary to keep the image from scumming. Edition ran well and we finished by 2 pm. Cleanup of rollers and slab followed.
'02 - Apr.2 - Tue.
Washed ink out through water with lithotine. Retired stone to grinding sink and gave it one grind of #220 grit. Stone ready for further use.
'02 - Apr.3 - Wed.
Printer #3 - (solid background)
Traced all elements down on a clean marble stone, ready for stop-out.
'02 - Apr.4 - Thurs.
Printer #3 - (solid background)
Mixed stop-out solution of 1/2oz. gum arabic to 5 drops nitric. Stopped-out all edges of stone and areas of bright colour plus added brush strokes to create textural areas as colour printing progresses. Cause and effect - negative and positive actions.
'02 - Apr.5 - Fri.
Printer #3 - (solid background)
Final application of gum stop-out to areas of considered luminescence. Stone to press bed and packed. Asphaltum applied over entire stone, this ink base adheres to the open areas of stone (not to the stopped-out areas) thus creating a positive printing ground while having worked on (stopped-out) the negative or non printing areas.
Log - page 8
'02 - Apr.6 - Sat.
Printer #3 - (solid background)
In shop at 11am. Enough time to roll-up image and give 1st. etch.
Worked roll-up ink to a fine consistency with spatula. Tranferred several strips to ink slab and rolled out thinly with 14" x 4" calfskin roller. With sponge washed all gum and asphaltum sludge from image on press-bed with clean water, dampened image with proofing sponges and proceeded to roll-up image with ink. Slow roll-up, took approx. 1 hr. - tapped in some areas with pallette knife (will protect these areas with gum when etching.) Cleaned all edges of stone with snake slip, washed and dried.
Prep for 1st. etch: Rosin and talc dusted on and excess wiped off with Kimwipes.
Formula: 2oz. of gum arabic in beaker - 12 drops of nitric added and mixed well. Straight gum on areas mentioned above, etch mix poured on image and hand massaged for 3-1/2 min. avoiding the weak areas until final minute, then including the entire stone. Mopped the excess gum/etch up with 1 cheesecloth and buffed dry and tight with another. Washed out cloths and hung to dry, then cleaned excess ink from slab and rolled out calfskin roller repeatedly on slab while scraping it away each time - this is repeated until only a small amount of ink remains on both. Wax paper laid over slab and wrapped and taped roller. This will hold a roller for many months without drying. Have used the slab consistently over a 20 year period without having to clean with solvent.
'02 - Apr.7 - Sun.
To Vancouver tomorrow for a few days celebrating my 74th. year with family. Removed the ink-etched image with lithotine solvent and dancolite, it is essential that all ink is removed from the etched image. Rubbed in asphaltum ink base on image and buffed smooth with wipes. This holds the image for an indefinite period without ink. Scraped calfskin roller with flex ink-knife, wrapped in wax paper again and racked.
Log - page 9
'02 - Apr.11 - Thur.
Drive home in rain 6 hrs. - pick up our Lhasa Apso K2 at boarding kennel. Supper and unload vehicle.
'02 - Apr.12 - Fri.
Unpacking, including art supplies. Received a small bottle of Behlen super blonde shellac and Alcohol torch fuel as a thinner and remover from Grant. Will use this for any future surface printing.
'02 - Apr.15 - Mon.
Finished some necessary work in pressroom.
'02 - Apr.17 - Wed.
Olga setting up new Windows 2000 programme. Selected digital photos to accompany process procedures of this lithograph online. Wrote captions for same.
'02 Apr.22 - Mon.
Printer #3 - (solid background)
Washed off asphaltum residue on image with clear water, immediately followed by roll-up in blk. using calfskin roller. Good roll-up, cleaned borders and dried stone. Prep. for 2nd. etch: Brushed on a combo of rosin and talc which I use for all solids not requiring special treatment. Buffed off excess powder. Formula for 2nd. etch: 2 oz. gum arabic - 20 dr. nitric. Hand rubbed etch over entire stone - on for 3-1/2 min. - wiped excess off then buffed in until dry.
'02 - Apr. 25 - Thur.
Mix new gum arabic: 12 ozs. distilled water to 14 ozs. dry gum powder. Set in pan of hot water to melt. Mixed colour ink, enough for rainbow roll using 23" neoprene roller.
Log - page 10
'02 - Apr.26 - 27 - Fri. & Sat.
Printer #3 - (solid background)
Ill - no work - wrapped mixed colour ink in wax paper to keep from drying.
'02 - Apr.28 - Sun.
Took morning walk with K2 on lake ice. Getting a little ratty near shore but still good further out. Dog loves sniffing near shore - I walk he sniffs, his nose remained glued to one twig he found interesting, I walked on. On return home he had not yet arrived - I retraced the route this time on land - calling and whistling - wind in pines the only sound. Back again this time directly close to lake, heard one short bark. Spotted him chest deep in water sitting on sub-ice below former ice now melted - he was supported in part by a submerged log, couln't scramble out as thin surface ice kept breaking. He was very cold having toughed it out for best part of an hour. Wrapped him in my parka and carried him home. Plunked him in laundry tub of lukewarm water and slowly brought up to room temp. Towelled off he was soon bouncing around celebrating his good fortune. Will leash him in future walks, as he remains still and quiet in situations he can't control.
'02 - Apr.29 - Mon.
Yard chores. Prep for printing.
'02 - Apr.30 - Tues.
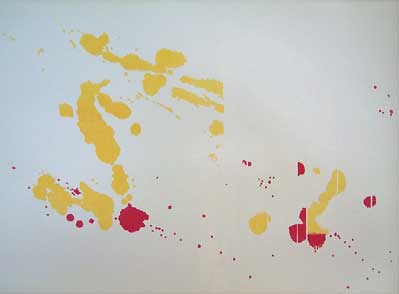
Press Run #3 - (background solid) - (Proof C)
As the 2 colours for blended inking had been premixed, stripped them with wide ink knife 1/2-1/2 on slab and rolled out to a smooth optically blended rainbow. With Olga assisting (sponging and applying paper) we ran the edition in approx. 2 hrs. Ran well. When paper showed signs of creasing due to heavy pressure I laid a stiff poly tympan over the paper, this coupled with the regular retractable tympan attached to the press solves an annoying problem with paper creasing. Olga first suggested this when we had the same problem with the Maltwood project in 2000.
'02 - May 1 - Wed.
Took digital photos before cleaning slab and roller after Apr.30 press run. Worked on tracing image for printer #6 down on stone.
'02 - May 9 - Thur.
Printer #6
Completed tracing - will combine line drawing, broad tonal drawing (crayon) or chalk, as Senefelder referred to it, with fine spattering to create a unifying structure - the bones of the composition.
Log - page 11
'02 - May 11 - Sat.
Printer #6
Worked on drawing as described above, gum stop-out with 10 drops nitric added, applied to all areas that will be affected by the heavy crayon work. Defined the overall concept with line drawing then applied broad strokes with #3 and #4 large flat sticks of crayon. Added spattering of tusche.
'02 - May 12 - Sun.
Printer #6
Finished the areas described above. Beefed up key drawing of printer #4.
'02 - May 14 - Tues.
Printer #4
Placed keystone on press bed and packed. Dusted image with talc only and removed excess. First etch formula: 2 ozs. gum - 6 drops nitric, worked over the drawing by hand for 1 min. Buffed dry and tight with cheesecloth.
Log - page 12
'02 - May 22 - Wed.
Printer #4
Washout of image with lithotine - exceptionally hard to remove - used warm breath on image to melt gum over dried tusche particles, very time consuming. Finally resorted to dancolite to clear the stone of original tusche wash. Washed away all residue remaining with clean water, and commenced rollup with a minimum of Graphic Chem. rollup-black per pass. Image came up slowly. Pulled two blk. proofs - then one pull combined with colour proof from 1st. and 2nd. press run - looks ok. This trial established inking procedure and press pressure. Used the extra tympan. Left all covered for the evening - 2nd. etch tomorrow.
'02 - May 23 - Thur.
Printer #4
Cleaned stone of several unwanted hickies and any sludge with snake slip. Prep for 2nd. etch: Dusted with rosin and talc, excess wiped off with soft Webril wipe. Formula for 2nd.etch: 2 oz. gum - 26 drops nitric (ph 0.5) light foaming action on test area of stone. Spread etch on stone and worked over the image by hand, concentrating on several darker areas - left on 3 min. Excess wiped off and hand wiped tight and dry with cheesecloth.
Log - page 13
'02 - June 7 - Fri.
Press Run #4 - Key - (Proof D)
Finally back to the press room after 2 week hiatus outdoors - snow and low temps. (0 c.) made this a good day to print. Washed out the inked and etched image (1st.) with lithotine and dancolite. Came out clean compared to 1st.etch washout. Olga acting as assistant applied triple ink to the key image in stone silver (to overprint the red and yellow images of 1st. and 2nd. press runs). She readied her sponges, mixed a fountain solution and a saucer of straight gum arabic. I added twice volume of aerocil to stone silver ink mix to shorten the tack. Washed away all gum etch and triple ink residue and proceeded to charge the image with colour, using a 23" x 10" neoprene roller. The 1st. pass received 4 rolls - the 2nd. 3 rolls. Pulled a newsprint proof to help establish colour. Repeated the above passes and pulled 1 proof on Arches and a combination proof - colour looks good (one has to guage the effect this will have on the sequences to come) when printing in this manner. Olga is using fountain solution every 3rd. pull as we start our press run. I decrease the rolls per pass to: 1st. pass - 3, 2nd.pass - 2 rolls using quick light rolling action. Pulled several more proofs then decreased to: 1st. and 2nd. pass - 2 rolls each.
Log - page 14
'02 - June 7 - Fri.
Press Run #4 - Key - (Proof D)
Continued press run - applied ink and press passes as established to keep image sharp. Olga applied gum arabic to darker areas as needed as well as overall fountain solution every 3rd. pull. Edition ran consistently well - finished in approx. 1-1/2 hrs. Inked and gummed image to save for digital photos re web site.
**At this point we begin our summer schedule of house maintenance, on-going exterior painting with much scaffolding of high gables on lakeside. Entertaining visitors to our gallery, autumn sketch trips, followed by winter preparations re: family visits etc. Who said an art career is boring?
2003 - Jan. 4 - Sat.
Printer #5
While it seems this project has been back-burnered, it has been front and centre in my thoughts - each time I pass through the pressroom a few minutes are spent contemplating the image and entertaining one possibility or another.
Started a tracing on limestone for a second red printing to develop the image further. Stopout etch: 1/2 oz. of gum - 8 dr. nitric. Stopped-out all areas adjacent to those to be drawn.
'03 - Jan.7 - Tues.
Printer #5
Water in distiller for a new batch. Start drawing red areas. Complicated design.
'03 - Jan.8 - Wed.
Printer #5
Spent afternoon in shop drawing a few lines before dark.
'03 - Jan.9 - Thurs.
Printer #5
In shop by 9.30 am. worked till 2.30. Red drawing shaping up. Need another day or so to finish it.
'03 - Jan.10 - Fri.
Printer #5
In shop by 10.45 am. - 14c. bright and sunny. Drawing over gum stopout using #4 & #3 Stones crayons - superior quality - dark and rich.
'03 - Jan.11 - Sat.
Printer #5
Finished sorting out the intricate line work of this second red drawing also drew roughly in the red areas already printed, this will overprint and add to the depth of colour. Stone ready for press bed.
Log - page 15
'03 - Jan.12 - Sun.
Printer #5
Stone on press bed and packed. Some touch up of drawing. Prep for 1st. etch : Dusted with rosin and talc and lightly buffed. Formula 1st. etch: 2 fl.ozs. gum - 25 dr. nitric. Poured on image and massaged by hand - on for 3-1/2 min. wiped off residue and buffed dry and tight with cheesecloth. Leave to rest overnight. Time for absorbtion into the living limestone - part of the 'magic' of this medium.
'03 - Jan.13 -17
Week shot wheeling and dealing for new vehicle. The need to economize on gas is prime motive. Driving is a necessity not a luxury when living in the boonies - infernal revenue of course doesn't see it that way.
'03 - Jan.18 - Sat.
Printer #5
Some touch up to printer #6, then to press-bed and work on printer #5. Washout of drawn image with lithotine and dancolite followed by addition of asphaltum ink base - buff dry. Work on softening a batch of rollup black.
'03 - Jan.19 - Sun.
Printer #5
Charged calfskin roller with softened rollup black, washed stone of excess asphaltum base and proceed to rollup image - very slow, has taken repeated charges while keeping dampening water to a minimum, however stone has remained clean with scumming left by a forward roll picked up by the calfskin on the reverse roll, as it should. Image is rich as the last passes are applied. Prep. for 2nd. etch: Fan dried, then applied rosin and talc and buffed off excess. Formula for 2nd. etch: 2 ozs. gum - 10 dr. nitric applied by hand and left image covered with etch for 3 min. Buffed dry and tight. Continued to work black rollup ink on slab.
Log - page 16
'03 - Jan.20 - Mon.
Printer #5
Mixed red ink (see colour swatch) Added #4 crayon work to outline clouds, combo rosin and talc dusting and a local etch of 10 dr. nitric to 1/2 oz. gum, worked with finger for 2 min. then buffed tight.
'03 - Jan.22 - Wed.
Printer #6
Prep. for 1st. etch: Brushed rosin on image, left for a few minutes then excess brushed off and talc dusted on and wiped through image - excess brushed off and image burnished with a webril wipe. Etch formula: 2 ozs. gum -12 dr. nitric, left etch on image for 3 min. then bufffed tight.
'03 - Jan.23 - Thur.
Press Run #5 - Red - (Proof E)
Washout image through protective gum-etch with lithotine and dancolite. Olga assisting at the press - she applies red triple ink as an ink base and buffs it tightly on image with small wad of cheesecloth. She readies sponges, saucer of gum and fountain solution. I roll out the colour on large marble inking slab with a neoprene roller (23" x 10") Assistant washes image free of triple ink residue, then sponges on clean distilled water and takes off excess with a 2nd. sponge. I apply the first pass giving image 4 rolls followed by a 2nd. repeat pass. Pulled several proofs to stabilized image. Established press pressure, and inking procedure: 1st. pass - 4 rolls, 2nd. pass - 3 rolls. Pulled 1 proof for record. Will pull a combination further into the edition. Ran edition without any problems. Photographed with digital cam. for website. Cleanup slab and roller. Finis run.
Log - page 17
'03 - Jan.24 - Fri.
Printer #6
Stone on press bed and packed, the first etch was applied Jan.22. Took out image with lithotine and dancolite then rubbed in asphaltum ink base. Left overnight.
'03 - Jan.25 - Sat.
Printer #6
Prep. for rollup and 2nd. etch: Washed away all asphaltum residue - immediately rolled up with stiff rollup ink ( combination of Dan Smith and Graphic Chemical ink) - kept charges lean and passes snappy. Slow rollup but image is crisp and full bodied. Some additions necessary. Sensitized these areas with alum and water brushed on, dried then washed areas with clear water - dried and ready for additional drawing. Used #3 crayon, finished finer lines with #4 crayon pencil. Brushed rosin over the entire stone and left overnight.
'03 - Jan.26 - Sun.
Printer #6
Prep. for 2nd.etch: Brushed away excess rosin, finished up with talc, brushed on then buffed in. Formula for 2nd. etch: 2 oz. gum - 25 dr. nitric - on by hand and left for 3 min. Buffed tight with cheesecloth. Let it rest overnight. Mixed jar of fresh gum arabic - 6oz. distilled water - 7oz. powdered gum. melted overnight and stored in frig the following day.
Log - page 18
'03 - Jan.27 - Mon.
Assistant has swim exercises mon and wed. Stone grinding for me from 9am. on - use the repetitive action of whirling stone as a meditative inducer, sometimes come up with unique images stirring about in the primal mud of limestone and water. Finished a marble with #220 grind - started a limestone with a long #100 grind.
'03 - Jan.29 - Wed.
Printer #6
Mixed blue ink for this press run. Continued with limestone grinding for brown printer - finished with a #220, filed edges - ready for use.
'03 - Jan.30 - Thur.
Added registration pins to both freshly ground stones. Added aerocil to blue ink in readiness for tomorrows press run.
'03 - Jan.31 - Fri.
Press Run #6 - Blue - (Proof F)
Washout image from its rollup black with lithotine and dancolite. Rubbed and buffed-in triple ink base derived from mixed blue and lithotine. This ensures that all pulls will run clean in the chosen colour. Charged 23' neoprene roller with blue mix - washed residue triple ink and gum etch from image, dampened clean image and stone with sponge and distilled water and proceeded to rollup image in coloured ink. Pulled several rough proofs - (problem) - centre of image not releasing ink to paper - checked scraper bar and discovered the strap had loosened allowing its centre to stretch beyond the scraper bar as it passed forward with loss of pressure in that area. Solution: restretched the strap and added fresh grease to the tympan. In catching this immediately the image was not damaged.
Log - page 19
'03 - Jan.31 - Fri.
Press Run #6 (continued) - Blue - (Proof F)
Pulled several proofs until the image stabilized then ran the edition. Olga sponged gum water over the image every third pull. The edition ran well. Pulled approx. 30 examples (we have allowed for a single proof of each colour as well as combination proofs). Finished run by 11.00 am. Afternoon cleanup of rollers and slab after several digital photos taken of inked image on stone, plus roller and inking slab.
'03 - Feb.4 - Tues.
Printer #7
Made a new mylar tracing sheet laying down only those areas needed for brown elements.
Layed this on clean limestone and traced down those elements - I use powdered red iron oxide wiped on a sheet of newsprint as a tranfer sheet - using a #6H or #9H Derwent pencil to impress the image through the mylar and onto the stone. Note: Following the printing of each colour and judging by its effect, a determination is made on the action that must be accomplished by the following colour. A rule of thumb dictates that lighter hues and tonal values (usually but not always) preceed the darker, with a black printing unnecessary in many cases.
'03 - Feb.5 - Wed.
Printer #7
Drawing the transferred image on stone. I will render ideas as they occur on a working drawing, sometimes several - using a progressive proof - crayon pencil and/or wax crayons work best on the sometimes half-dry ink surfaces of these proofs. (This is using lithography as a true creative medium and not as a reproductive method. The fact that multiple images can be pulled of the processed work should not make of it a lesser art form as has been suggested, but rather, shows the skills of the maker to full advantage).
'03 - Feb.6 - Thur.
Printer #7
Stop out all non printing elements within the drawing area, mix is 1/2 oz. of gum to 8 dr. nitric acid brushed on. (As a rough hatching method will be used, it is is more expedient to stop-out these areas with water-soluble gum allowing the artist the freedom to draw without stopping the drawing motion - in processing the crayon particles float off the stopped-out portions when washed with water).
Log - page 20
'03 - Feb.9 - Sun.
Printer #7
Gum stop-out all areas of 'tusk' to finish drawing. Afternoon Memorial Service honouring late friend Don Combs at his home at the 108 ranch.
'03 - Feb.10 - Mon.
Printer #7
Weather clear and dry -10c. Finished drawing tonal areas. Moved stone to press bed and packed.
'03 - Feb.11 - Tues.
Printer #7
Prep for 1st. etch: Rosin and talc, buffed off excess. Etch formula: 2 oz. gum - 30 dr. nitric poured on and worked by hand - on for 3 1/2 min. then wiped and buffed tight with cheesecloths. Printer #8 - Marble stone - will do a textural overprinting of the background. Stop-out all areas that do not require this printing colour - stop-out formula: 1/2 gum - 10 dr. nitric, slight effervesence. Applied this mix. Will give the sky a heavy gum spatter (negative area).
'03 - Feb.12 - Wed.
Printer #7
Mix brown ink for thur. press run (see colour chart). Washed out image prior to rollup. Prep for 2nd. etch: Applied asphaltum ink base, dried and washed all excess off with clear water followed by rollup - good image - etch formula: 2 oz. gum - 20 dr nitric - on for 3 min. then buffed in tight and left to rest overnight.
'03 - Feb.13 - Thur.
Press Run #7 - Brown - (Proof G)
Washout rollup ink with lithotine and dancolite then applied asphaltum ink base (little ned for a triple ink base as asphaltum is same colour as the brown ink mix). Washed all excess off including the gum/etch with clean water and proceeded to charge the image with brown ink using the 23" neoprene roller. Several proofs established press pressure and inking capabilities of this image - used 3 charges for awhile with assistant applying fountain solution every 2nd. pull. Image has started to lose its crispness, will scrape the slab, add aerocil to reduce the tack even more and use a thin ink on the slab by scraping the edges clean as the ink spreads to the sides. The composition of litho dk. brown has always been rather grainy and requires special attention when running. A Stones #4 crayon is rich enough for this type of drawing - (I had used a softer #3 as well as #4 to gain richness). Continued on, reducing charges to 2, with 2 rolls for the 1st. and 1 quick and snappy for the second. Ran well. Racked the edition to dry the ink prior to next press run Cleaned slab and roller after supper. Finis.
Log - page 21
'03 - Feb.14 - Fri.
Printer #8
Working on a marble stone to be used as a textural overprinting of the sky and mountain areas - a lightening of those areas already printed in orange and gray. In some ways this is a compensation printing - but in this instance deemed necessary and not detrimental to the overall concept.
'03 - Feb.15-16 - Sat. & Sun.
Attended a friends concert of early music (lute with voice) in Kamloops along with our son Grant and daughter-in -law Jan. Sun. brunch with the artists. Home early aft.
'03 - Feb.17 - Mon.
Printer #8
Paper masked off areas not needing spatter. Formula for a negative gum spatter: 1oz. of gum - 8 dr.of nitric - a brushfull of powdered red oxide pigment (non greasy) mixed in allows one to see the spatters progression and visualize the positive areas to be printed. This type of image-making is governed by experience, the basic lesson - when to stop.
'03 - Feb.18 - Tue.
Necessary household chore (wood stove cleaning) requires the same patience as drawing on stones. Olga conducts, I assist.
'03 - Feb.19 - Wed.
Printer #8
In press room by afternoon, #7 printer off press bed and #8 on and packed. Buffed in asphaltum over the rough gum spattered surface of the stone - the negative aspect of the work is immediately transposed to a positive image. Spent an hour or so grinding a marble stone for next printer.
Log - page 22
'03 - Feb.21 - Fri.
Printer #8
Washout all gum spattering and asphaltum sludge from stone with clean water followed by a rollup in black ink; had to modify tacky ink with #00 press varnish (basically linseed oil). Rolled up well.
'03 - Feb.22 - Sat.
Printer #8
Prep for 1st. etch: Dusted with rosin and talc, brushed and buffed in excess. Formula for 1st. etch: 2oz. gum - 35dr. nitric on for 3 1/2 min., polished dry and tight with several cheesecloths. Left over lunch then prepared for 2nd. etch. Washed out inked image with lithotine and dancolite. Added asphaltum ink base, dried - then washed excess away with clean water followed by a press black rollup as per 1st. etch. Good rollup. Dried image then dusted with combination of rosin and talc for this solid textural image, polished off
with kimwipe. Formula for 2nd. etch: 2oz. gum - 20dr. nitric on for 3-1/2 min. then buffed tight.
'03 - Feb.23 - Mon.
Printer #8
Cleaned rollup inking slab and all ink knives. Attended to press - greasing etc.
Ground the next stone (marble) for another surface printing. 2 gr. #100, 1gr. #180, 1gr. #220 and filed all edges. Mixed colour for combined inking (rainbow) for press run #8 - (see colour chart).
'03 - Feb. 24 - Tues.
Press Run #8 - (lt. Beige & lt. Gray combination) - Proof (H)
Prep for press run: Washout etched black ink from image - dry and rub in triple ink combination colour ink base. Strip 2 colours on inking slab and roll out to a visually well blended mix. With the 23" neoprene roller charged with its blended ink the image is washed of all residue triple ink and the 1st. pass of colour rolled on - followed by a 2nd. pass. Several proofs are pulled to stabilize image and then the edition is run - recording proofs are pulled as the run progresses. Ran all in 2 hrs. without encountering any difficulties. Cleanup of slab and rollers followed.
Log - page 23
'03 - Feb.26 - Wed.
Printer #9 - (surface printer)
Printer #8 off press bed. Printer #9 marble to sink for a med. etch prior to work. Formula: 1 oz. gum - 10 dr. nitric. Poured mix on stone and hand massaged it - allowed to remain for 3-1/2 min. then buffed in and dry with cheesecloth. Washed this gum/etch off several times while in sink using a clean sponge. The stone is now ready to use as a surface printer. Stone on portable drawing bench, pins attached and the mylar tracer snapped on the pins. This image is quite simple, several lines accomplished with the brush plus several spots and a minimum of spattering. Drawing is completed and the stone transferred to the press bed and packed to a level surface.
'03 - Feb.27 - Thur.
Printer #9 - (surface printer)
Started the day by a #100 grind on the next stone to be used. Decided to lightly etch this image to try and get a sharp solid effect. The stone is dampened and rolled up with press black. As suspected the shellac has not taken on several areas of this stone. Retraced and re-shellaced these areas several times until ink adhered and a strong image produced. Dusted with talc only. Formula for 1st. etch: 1-1/2 oz. gum - 12 dr. nitric on for 1-1/2 min., then buffed tight. Left on press bed.
'03 - Mar.2 - Sun.
Snowing, 0 c. Sun out by 10am. Finished grinding stone for printer #10 - placed on drawing bench, attached pins and ready for drawing.
Log - page 24
'03 - Mar.4 - Tue.
Press Run #9 - Green -(surface printing) - (Proof I)
Washout of image rollup blk. with lithotine and dancolite. Rubbed in triple ink green and buffed well. Sponged away all excess triple ink and gum/etch with clean water and immediately rolled up image in green ink with neoprene roller. Pulled several proofs and then ran edition. To better define the green against strong reds and yellows the image was double printed. Ran well. Cleanup of ink slab and roller followed. Racked edition.
'03 - Mar.5 - Wed.
Printer #11
Heavy snow all night and continuing today, roads unplowed. Working on tracing of black elements for printing #10, completed same.
'03 - Mar.6 - Thur.
Stone off press bed. Photographed proofs to date plus any stones with images unground and intact. Olga downloaded all to html working site.
'03 - Mar.10 - Mon.
Printer #11
Working on black drawing. Made a card jig for spiral lines, drawing them with a 9h Derwent pencil 1st. then a sharpened #4 Stones crayon, then fine brush and/or pen with tusche. Printer #11 has to be started before Printer #10 to better judge how to treat the latter.
'03 - Mar.11 - Tue.
Printer #11
Work on blk. drawing continues - intricate and time consuming.
Log - page 25
'03 - Mar.12 - Wed.
Printer #11
Work on blk. drawing.
'03 - Mar. 13,14,15
Printer #11
My black drawing and the ides of march have coincided. Have always felt a certain kinship with Julius on this day, my 75th b.d. Great to celebrate it with family - Son and Grandson visiting for a few days. Olga keeps us all glued together with her famous dinners. I believe I may have worked a few hours on blk drawing on the days noted.
'03 - Mar.16 - Sun.
Printer #11
Work on black drawing continues. Placed printed image #9 in sink and gave it a long grind with a #220 carborundum grit to take off any effects the etches may have had on its surface. As this was a shellac image no grease was involved and a deep grind is unnecessary. This marble stone will be used to draw printer #10.
'03 - Mar.17,18,19
Printer #11
Finalized black drawing.
'03 - Mar.20 - Thur.
Printer #10
This will be a spattered textural drawing to print in a blended colour to precede the printing of #11.
'03 - Mar.23 - Sun.
Printer #10
Work continued with a brushed gum/acid stopout on all non-printing areas followed by a heavy positive spattering of tusche overall. Prep for 1st. etch: rosin and talc dusting, buffed off excess. Formula 1st. etch: 1oz. gum - 25 dr. nitric on for 3 min. then buffed tight with cheesecloth.
'03 - Mar.24 - Mon.
Printer #10
Prep for 2nd. etch: Washout with lithotine and dancolite. Rubbed in asphaltum ink base to a thin uniform film. Charged calfskin inking roller with prepared rollup black. Sponged excess asphaltum and dried gum/etch off with clean water and rolled image up immediately. Good rollup - cleaned borders of any sludge and dried stone. Dusted talc only over image and resensitized 1 missing area with alum and water, washed clean, and applied mylar tracer over image, traced down this element and eliminated a few unwanted spots from another. Gave the new drawn area a local etch then rosin and talced the entire stone in preparation for a 2nd. etch. Formula for 2nd. etch: 2 oz.gum - 10 dr. nitric, on for 3-1/2 min. buffed tight. Mixed colour in preparation for blended inking - buff upper, green lower (see colour chart).
Log - page 26
'03 - Mar.25 - Tue.
Press Run #10 - (blended ochre and green) - (Proof I)
Prep for press run: washout press black with lithotine and dancolite. Olga rubs-on a triple ink base of mixed colour and buffs it to a thin film. Cut tack of colour ink mix by the addition of aerocil, applied with ink knife to ink slab and rolled out to a blended mixture. Olga prepares her press sponges, and a fountain solution. She washes off gum/etch and surplus ink base with clean water and the first and second passes are applied to the image using 2 rolls per pass with 23" neoprene roller. Pull several proofs to assess press pressure and ink quality. Proceed to run the edition - image ran well keeping stone med. wet with only minimum use of fountain solution. Cleaned roller and slab, washed out image, sponges etc. finis by 3pm.
'03 - Mar.26 - Wed.
Printer #11
Light snow falling. Touch up drawing and then place stone on press bed and pack (as all stones are not created equal in thickness - strips of paper slipped beneath a stone using a manual micrometer assure some degree of uniform height from press bed, making for an even pressure from scraper bar to paper to inked image). Prep for 1st. etch: rosin and talc image and buff off excess. Formula for 1st. etch: 2oz. gum arabic - 27dr. nitric acid, pour on and hand distribute evenly over image and leave on for 3-1/2 min. - buff dry and tight with cheesecloths. Mix fresh gum arabic: 6oz. distilled water - 7 oz. powdered gum arabic. Continue to mix now and then over the course of the day until all is melted, then store in frig.
'03 - Mar.27 - Thur.
Printer #11
Washout image through protection of 1st. gum/etch with lithotine and dancolite. Apply asphaltum ink base and buff to an even coating. Wash all residue off with clear water and proceed to roll-up with calfskin roller in press black. Pull 2 proofs to ascertain line drawing strength - some retouch of lines is required. Resensitize stone in these areas with alum and water and wash off thoroughly after dry - draw in the weak lines with a #4 Stones crayon.
Log - page 27
'Thur. Mar. 27 - (continued)
Prep for 2nd. etch: Apply rosin and talc to drawing and dust off excess. Formula 2nd. etch: 2oz. gum - 30dr. nitric - on for 3 1/2 min. then buffed tight with cheesecloths. Mix black for press run #11. Instead of following the norm of printing with a crayon black - I have had success in running with a mixed black made from equal amounts of litho red, green, blue, and dr. brown. This allows me the advantage of using the large diameter rollers rather than the small calfskin roller or the neoprene 'hickey-picker' best suited to press blacks. Control is the same as printing in colour. An additive should not be neccessary to shorten tack.
'03 - Mar.28 - Fri.
Press Run #11 - Black - (Proof J)
Prep for run: Washout image with lithotine and dancolite - rub in asphaltum ink base and buff to an even film. Charged 23" neoprene roller with mixed black - Olga washes gum/etch and asphaltum sludge from stone with clean water, keeping the image damp, the first pass is applied followed immediately with the second. Several proofs are pulled - added a touch of #3 varn and a bit of rollup black to ink mix lengthening the tack and allowing for better saturation and release of paper from inked stone. Increased scaper-bar pressure, pulled another proof or two until assured the image is stable. Ran the edition with the application of fountain solution every four or five pulls. Ran well. Photographed stages for website. Evening cleanup of rollers etc. Racked edition and all proofs for a few days drying time.
'03 - Mar.31 - Mon.
Printer #12
Start grinding marble for varnish plate. Have decided to varnish all bright 'clouds' and vertical columns in red. Photographed all proofs and procedures to date.
Log - page 28
'03 - Apr.1 - Tue.
Printer #12
Finished stone grinding. Left in sink for a cleaning and sensitizing etch. Formula: 1oz. gum - 10dr. nitric, hand massage and left on for 3-1/2 min. then buffed tight.
'03 - Apr.2 - Wed.
Printer#12
Hosed all etch residue away with water in prep. for shellac base for surface printing of varnish. Dried stone well and painted a gum stopout around all areas to receive shellac. Formula: 1/2oz. gum - 10dr. nitric. (lt. foaming action).
'03 - Apr.3 - Thur.
Printer #12
Painted all areas to receive varnish in shellac base. Placed stone on press bed and packed level. Took edition and proofs off drying rack in preparation for press run.
'03 - Apr.4 - Fri.
Press Run #12 - (surface printing) - Varnish
Ran this stone without press assistant. As ink is not involved and roller can be manipulated in differing directions, used a 16" neoprene 'hickey-picker'. Applied a #3 varnish for this run. Shellaced image received the varnish and ran well using 3 rolls per pass. After press run tinted the varnish with yellow ochre and pulled a proof for record. Racked edition and cleaned all rollers and sponges etc.
Log - page 29
'03 - Apr.6 - Sun.
Printer #13
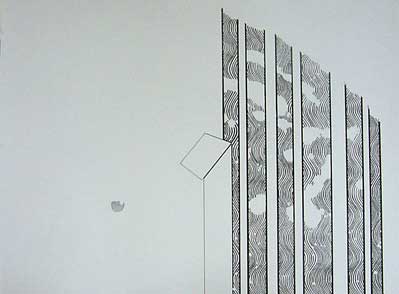
In collaboration with Olga I decided to take #140 one step further to emphasize the dramatic aspect it now suggests. Perhaps Jock's theory about automatism has validity as this piece of work seems to be on a course of it's own making. Will grind a stone for a final dark-grey blended printing in the upper 'sky' area. Ground one marble stone, last grind #180 (rougher texture than #220).
'03 - Apr.8 - Tues.
Printer #13
Traced down image areas to receive Grey ink.
'03 - Apr.9 - Wed.
Printer #13
Painted out non-image areas with gum/nitric resist of 1 oz. gum to 10 d. nitric - (no frothing on stone).
'03 - Apr.10 - Thurs.
Printer#13
Finished stop out of non-image areas. Moved stone to press bed and packed. Mixed fresh gum arabic and left to dissolve.
Log - page 30
'03 - Apr.14 - Mon.
Printer#13
Rubbed asphaltum into open areas to be printed (gum mask protects non-image areas) dried with blow drier. Washed away residue of asphaltum plus gum mask and proceeded to rollup image in black rollup ink using calfskin roller. Prep. for 1st etch - dried stone then dusted image with combo rosin and talc, buffed away all excess. 1st etch formula: 2ozs. gum - 35dr. nitric. Marble shows little frothing action. Left on for 3/12 min. then wiped and buffed dry with cheesecloth.
'03 - Apr.28 - Mon.
Printer #13
Washed out etched image with lithotine and dancolite in preparation for 2nd. etch - rubbed up image in asphaltum base, washed away excess and rolled up in rollup ink using calfskin roller slow rollup. Formula 2nd. etch: 2ozs. gum, 10 dr. nitric applied by hand, left on 2 1/2 min. then buffed dry. Mixed grey ink (dark and light - see color swatches).
'03 - Apr.29 - Tues.
Press Run #13
Rubbed up image in a lt. grey triple ink and dried. Assistant Olga prepared all sponges and water pans ready for press run. Stripped two color mix on marble slab and blended with 23" neoprene roller. Washed away all residue from etch and triple ink with fresh water and proceeded to rollup in color. Pulled several proofs then proceeded with edition press run. Cleanup rollers and press equipment.
'03 - Apr.30 - Wed.
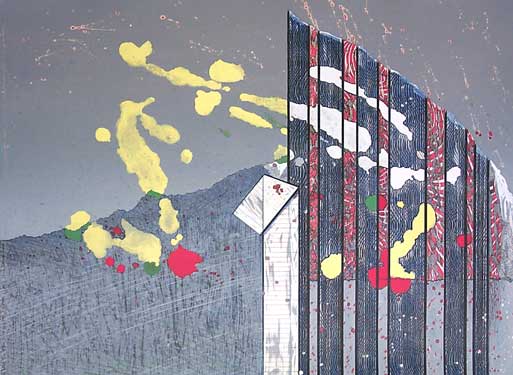
All proofs and examples of lithograph #140 are now racked for a drying period. Once dry a clean stone was used to create a varnish plate using shellac. The red, yello and green 'cloud shapes' were the only areas to receive varnish. Another few days drying time ensued. After this the printer's proof or BAT. which was chosen as the work progressed towards completion, will be displayed and all examples matched to it's quality (curation). All work not meeting this standard is destroyed. The resulting edition is then numbered, titled, signed and chopped by the artist. A Cariboo Stone Press Authentication Certificate is issued with each example verifying this information.
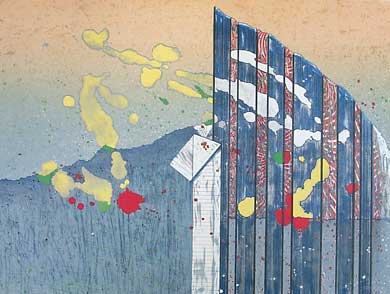
Lithograph #140 - 'Primal Force' - homage to Jock Macdonald
Edition No: 10 examples
Bat: 1 example
Artist's Proofs: 1 example
Dedication Proof: 1 example
Museum Proof: 1 example
Stats: 14 press runs, 16 colours including 1 toned black, 1 varnish plate.
|